Making your Own Grid:
After watching parts 1 – 3, you should have an understanding of the solutions mastery learning and The Grid Method offer. You should also have a good idea of how a Mastery Grid is organized.
Now, we’d like to walk you through how the Mastery Grid gets created; from your state’s standards, all the way to the Learning Opportunities and assessments.
The alignment of this instructional design is one of the most powerful components of The Grid Method system. It allows you to improve your efficiency of instruction, increase the quality of the learning tasks, and reduce wasted time or effort on unnecessary tasks or lessons that are just “fillers.”
Before we go any further…
You will want to make sure you review your notes to make sure you understand how a Grid is broken down in to its two main components of Learning Targets and Learning Opportunities. This will help you understand how to develop your own.
Moving on.
Now that you’ve mastered how a Grid is designed (if you haven’t, please review Part 3), let’s talk about how to develop your own.
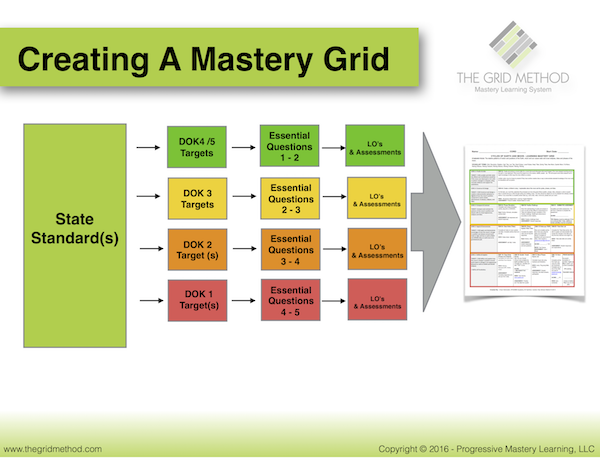
The steps to developing your Mastery Grids are as follows:
- Develop Tiered Learning Targets (using Webb’s DOK)
- Create Aligned Essential Questions (Fewer EQ’s at Higher Levels)
- Develop LO’s and Aligned Assessments
- Organize Your Mastery Grid
The image below is a great reference for how a Mastery Grid is developed.
As you can see, the Mastery Grids utilized with The Grid Method create a perfectly aligned curriculum and unit design to maximize time on task and efficiency of instruction. From standard, to targets, to questions and learning opportunities, the Mastery Grid is perfectly aligned with each component and built to increase knowledge as progress is made.
If you would like to make your own Mastery Grid to use you can use this template. (if you need google docs click here)

